
To secure VPS in 2026, you need more than basic protection. Modern attacks are faster, automated, and target every exposed server within hours. If your VPS is not properly secured, attackers can breach your system, steal data, or deploy malicious software.
This guide gives you a complete checklist to secure your VPS using Server Explorer’s automated security scanner, even if you are not a security expert.
This comprehensive security checklist shows you how to protect your VPS using Server Explorer’s visual security tools—making professional-grade server security accessible without memorizing dozens of commands.
Why You Must Secure VPS in 2026
The Reality of Server Attacks
To secure VPS in 2026, you must understand how quickly automated bots attack new servers.
- Brute-force SSH passwords
- Scan for vulnerable services
- Exploit known CVEs (Common Vulnerabilities and Exposures)
- Install cryptocurrency miners
- Deploy ransomware payloads
You don’t need to be targeted specifically.
In fact, simply being online is enough for bots to attack your VPS.
Because of this, every server exposed to the internet becomes a potential target.
Common Attack Vectors
- Weak SSH authentication – Default passwords, no key authentication
- Outdated software – Unpatched vulnerabilities in packages
- Open ports – Unnecessary services exposed to the internet
- Weak application security – SQL injection, XSS, insecure APIs
- Poor file permissions – Writable directories accessible to attackers
- No firewall – All ports open by default on many VPS providers
- Lack of monitoring – Compromises go undetected for weeks
The Cost of Compromise
Financial impact:
- Data breach fines (GDPR: up to €20M or 4% of revenue)
- Ransomware payments
- Lost business during downtime
- Recovery and forensics costs
Reputational damage:
- Customer trust destroyed
- Brand reputation harmed
- Potential legal liability
The good news? Most attacks target low-hanging fruit. A properly secured VPS becomes an unattractive target.
Server Explorer Security Scanner: Automated Protection
Server Explorer makes it easier to secure VPS in 2026 by detecting weak configurations automatically.
How It Works
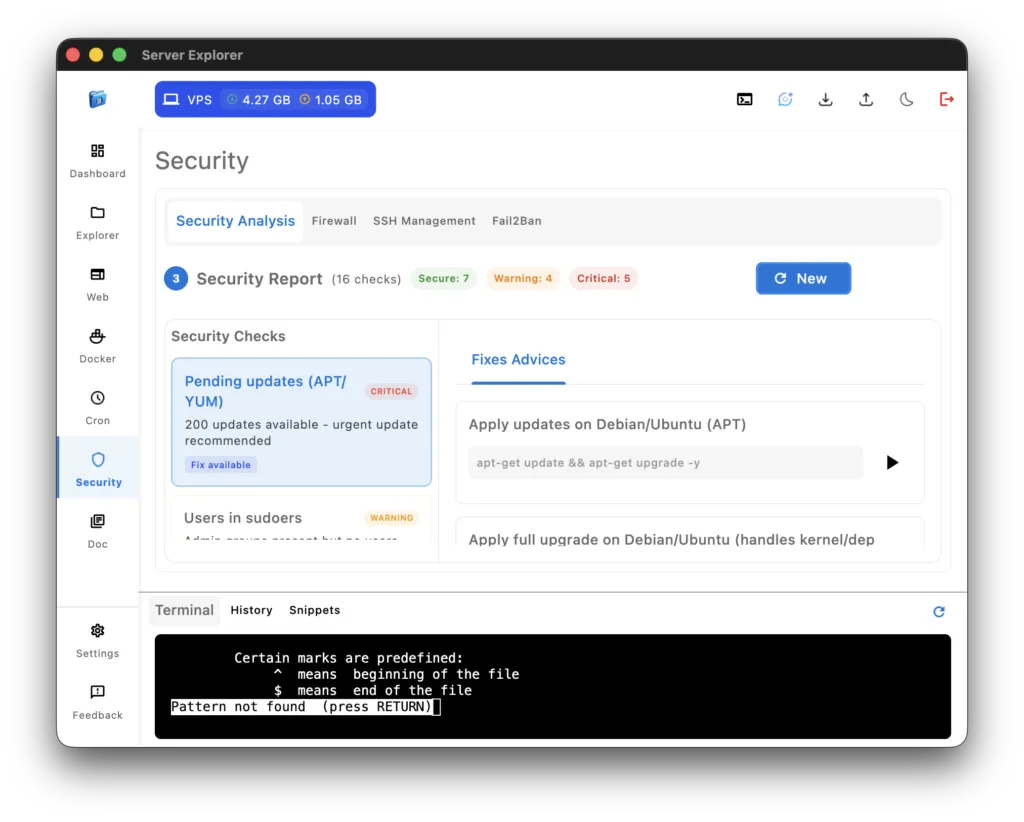
Navigate to the Security section in Server Explorer and click “Run Security Scan”. The scanner automatically analyzes:
-
Authentication & Access Control
- SSH PermitRootLogin status
- SSH PasswordAuthentication configuration
- SSH MaxAuthTries and LoginGraceTime settings
- Users with sudo privileges
- Fail2Ban installation and status
-
Network Security
- Firewall status (UFW/firewalld)
- Open ports and listening services
- Common network daemons (unnecessary services)
- Docker TCP socket exposure (port 2375)
-
System Integrity
- Pending security updates (APT/Yum)
- Automatic security updates configuration
- Time synchronization service (NTP)
- Filesystem hardening (/tmp, /var, /log)
- Auditd or journald persistent logging
-
Additional Protections
- SELinux or AppArmor confinement status
- Certbot auto-renewal configuration
Understanding Security Levels
The scanner categorizes findings:
🟢 Secure – Configuration follows best practices, no action needed
🟠 Warning – Potential vulnerability, should be addressed soon
🔴 Critical – Serious security issue requiring immediate action
Each finding includes:
- Clear description of what was checked
- Current status on your server
- Why it matters (security impact)
- How to fix (step-by-step instructions)
Understanding Your Security Report
Critical Checks Explained
Let’s break down what each security check means and why it matters:
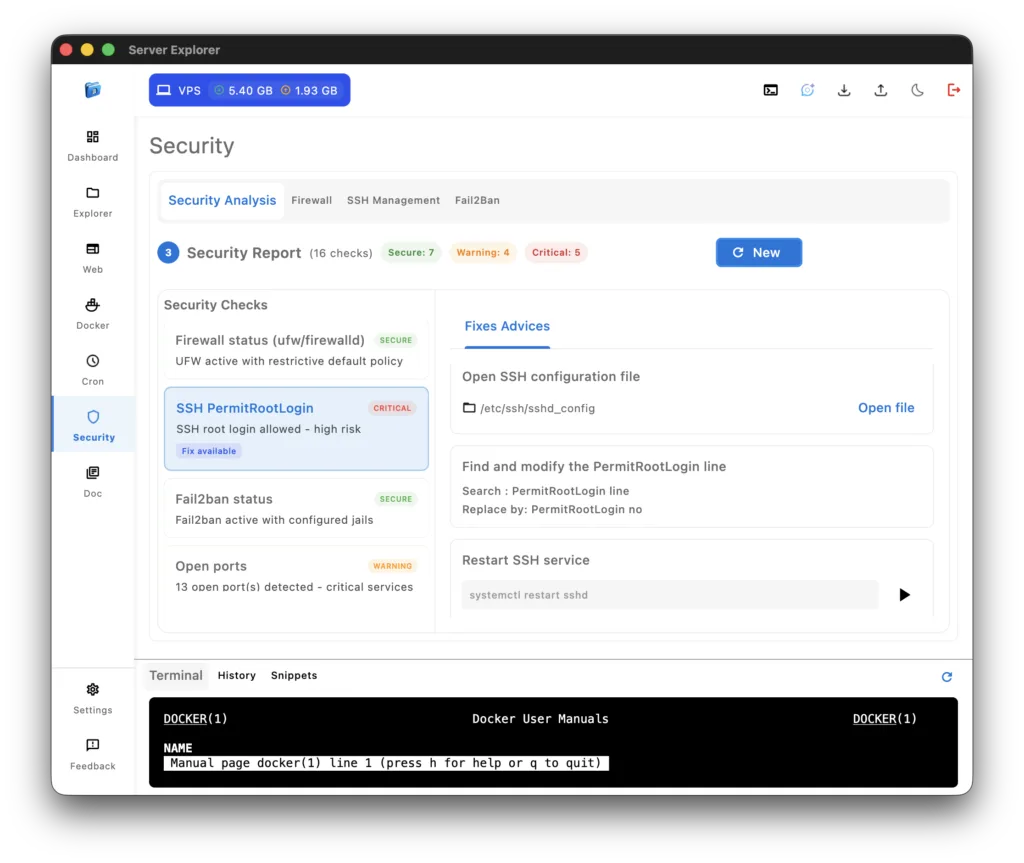
1. Firewall Status (UFW/firewalld)
What it checks: Whether a firewall is active and properly configured
Why it matters: Without a firewall, all ports are accessible from the internet. This is like leaving all doors and windows of your house open.
Red flag: Firewall inactive or not installed
How Server Explorer helps: Shows firewall status instantly. If inactive, provides commands to enable it.
2. SSH PermitRootLogin
What it checks: Whether root login via SSH is allowed
Why it matters: Root has unlimited privileges. If compromised, attackers have complete control. Best practice is to use a regular user with sudo.
Red flag: PermitRootLogin yes
Secure config: PermitRootLogin no
3. SSH PasswordAuthentication
What it checks: Whether password-based SSH login is enabled
Why it matters: Passwords can be brute-forced. SSH keys are significantly more secure.
Red flag: PasswordAuthentication yes
Secure config: PasswordAuthentication no (with SSH keys configured)
4. SSH MaxAuthTries & LoginGraceTime
What it checks: Login attempt limits and timeout settings
Why it matters: Prevents brute-force attacks by limiting attempts and disconnecting slow attackers
Recommended values:
- MaxAuthTries: 3-6 attempts
- LoginGraceTime: 60 seconds
5. Fail2Ban Status
What it checks: Whether Fail2Ban is installed and active
Why it matters: Automatically bans IPs after repeated failed login attempts. Acts as automated defense against brute-force attacks.
Red flag: Not installed or inactive
Impact: Bots can attempt thousands of password combinations without consequences
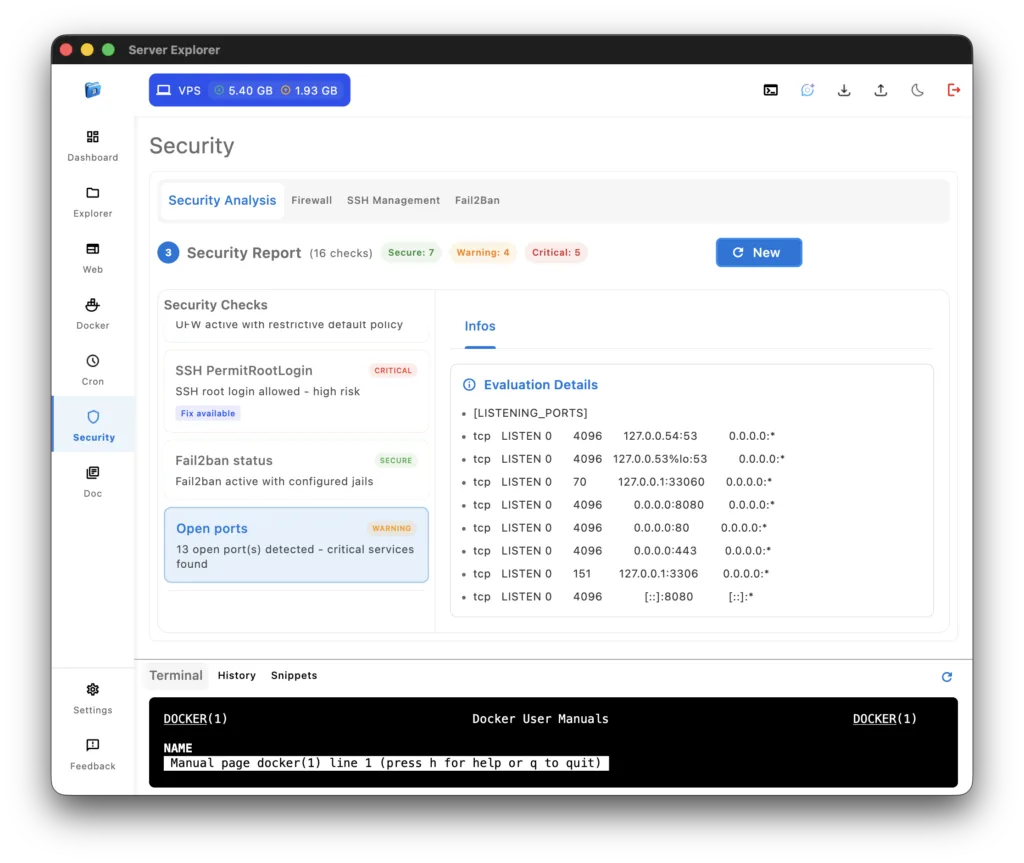
6. Open Ports
What it checks: All listening ports and their associated services
Why it matters: Each open port is a potential attack vector. Only necessary services should be exposed.
Common legitimate ports:
- 22: SSH
- 80: HTTP
- 443: HTTPS
- 3306: MySQL (should only be on localhost!)
- 5432: PostgreSQL (should only be on localhost!)
Warning signs: Unexpected ports, database ports accessible from internet
7. Pending Updates (APT/Yum)
What it checks: Available security and system updates
Why it matters: Unpatched vulnerabilities are the #1 cause of successful attacks. Many exploits target known CVEs in outdated packages.
Red flag: Multiple pending security updates
Best practice: Update within 7 days of security patches being released
8. Users in Sudoers
What it checks: Which users have sudo (administrative) privileges
Why it matters: Excessive sudo access increases attack surface. Compromised non-admin accounts become admin if they have sudo.
Warning signs:
- Unnecessary users with sudo
- Generic usernames like “admin”, “test”
- Forgotten accounts from old employees
9. Automatic Security Updates
What it checks: Whether unattended-upgrades is configured for security patches
Why it matters: Critical security updates are applied automatically, closing vulnerability windows faster.
Secure config: unattended-upgrades package installed and configured
Trade-off: Small risk of update breaking something vs. large risk of unpatched vulnerabilities
10. Time Synchronization Service
What it checks: Whether NTP (Network Time Protocol) is active
Why it matters: Accurate time is critical for:
- Log correlation during security investigations
- SSL/TLS certificate validation
- Cron job scheduling
- Authentication token expiry
Red flag: No time sync service or large time drift
11. Enabled Network Daemons
What it checks: Common unnecessary services (Avahi, Cups, Bluetooth, etc.)
Why it matters: Each running service:
- Consumes resources
- Increases attack surface
- May have vulnerabilities
Common culprits on servers:
-
avahi-daemon(network discovery – rarely needed on servers) -
cups(printing service – why on a server?) -
bluetooth(wireless connectivity – not needed on VPS)
12. Filesystem Hardening (/tmp, /var, /log)
What it checks: Mount options for critical partitions (noexec, nosuid, nodev)
Why it matters: Prevents:
- Execution of malicious code from /tmp
- Privilege escalation via setuid binaries
- Device file exploits
Copied!/tmp noexec,nosuid,nodev /var/tmp noexec,nosuid,nodev
13. Auditd Active or Journald Persistent
What it checks: Whether system events are logged persistently
Why it matters: Forensic investigation and compliance require comprehensive audit logs. Without persistent logging, you can’t investigate incidents.
Options:
- Auditd: Dedicated audit daemon, more detailed
- Journald persistent: Built-in systemd logging with persistence
14. Certbot Auto-Renew
What it checks: Whether Let’s Encrypt certificates renew automatically
Why it matters: Expired certificates break your site and destroy user trust. Auto-renewal prevents embarrassing outages.
Secure config: Certbot timer/cron active, certificates renew before expiry
Check manually: sudo certbot renew --dry-run
15. Docker TCP 2375
What it checks: Whether Docker daemon is exposed on TCP port 2375 (unencrypted)
Why it matters: This is a critical vulnerability. An exposed Docker daemon gives attackers complete control over your containers and potentially the host system.
Red flag: Port 2375 open to the internet
Secure config: Docker daemon only on Unix socket (/var/run/docker.sock) or encrypted TLS on 2376
16. SELinux/AppArmor Confinement
What it checks: Whether mandatory access control (MAC) is enabled
Why it matters: Adds additional security layer beyond traditional permissions. Even if a service is compromised, confinement limits damage.
Options:
- SELinux: Red Hat/CentOS/Fedora default
- AppArmor: Ubuntu/Debian default
Warning: Enforcing mode can break misconfigured applications. Monitor logs carefully.
Essential Steps to Secure VPS in 2026
Priority 1: Critical Issues (Fix Immediately)
Enable Firewall
If scanner shows firewall inactive:
Copied!# Ubuntu/Debian (UFW) sudo ufw default deny incoming sudo ufw default allow outgoing sudo ufw allow 22/tcp # SSH - CRITICAL: Do this first! sudo ufw allow 80/tcp # HTTP sudo ufw allow 443/tcp # HTTPS sudo ufw enable # RHEL/CentOS (firewalld) sudo systemctl start firewalld sudo systemctl enable firewalld sudo firewall-cmd --permanent --add-service=ssh sudo firewall-cmd --permanent --add-service=http sudo firewall-cmd --permanent --add-service=https sudo firewall-cmd --reload
Verify via Server Explorer: Rerun security scan – firewall should show 🟢 green
Disable Root SSH Login
Edit SSH config via Explorer → /etc/ssh/sshd_config:
Copied!PermitRootLogin no
Copied!# Create user if needed sudo adduser yourusername sudo usermod -aG sudo yourusername # Test sudo access before disabling root su - yourusername sudo whoami # Should output "root"
Apply changes:
Copied!sudo systemctl restart sshd
Disable Password Authentication
After setting up SSH keys:
Edit /etc/ssh/sshd_config:
Copied!PasswordAuthentication no PubkeyAuthentication yes
Generate SSH key (on your local machine):
ssh-keygen -t ed25519 -C “your-email@example.com”
Copied!ssh-copy-id yourusername@your-server-ip
Restart SSH:
Copied!sudo systemctl restart sshd

Close Docker TCP Port 2375
If Docker daemon is exposed:
Edit /etc/docker/daemon.json:
Copied!{ "hosts": ["unix:///var/run/docker.sock"] }
Or edit systemd service:
Copied!sudo systemctl edit docker.service
Remove any -H tcp://0.0.0.0:2375 from ExecStart
Restart Docker:
Copied!sudo systemctl restart docker
Verify: Port 2375 should not appear in open ports list
Priority 2: Important Issues (Fix This Week)
Install and Configure Fail2Ban
Copied!# Install sudo apt install fail2ban # Ubuntu/Debian sudo yum install fail2ban # RHEL/CentOS # Enable and start sudo systemctl enable fail2ban sudo systemctl start fail2ban # Create local config sudo cp /etc/fail2ban/jail.conf /etc/fail2ban/jail.local
Edit /etc/fail2ban/jail.local:
Copied![sshd] enabled = true port = 22 filter = sshd logpath = /var/log/auth.log maxretry = 3 bantime = 3600 findtime = 600
Restart Fail2Ban:
Copied!sudo systemctl restart fail2ban
Check status:
Copied!sudo fail2ban-client status sshd
Configure Automatic Security Up
Copied!# Ubuntu/Debian sudo apt install unattended-upgrades sudo dpkg-reconfigure -plow unattended-upgrades # RHEL/CentOS sudo yum install yum-cron sudo systemctl enable yum-cron sudo systemctl start yum-cron
Configure (Ubuntu/Debian) – edit /etc/apt/apt.conf.d/50unattended-upgrades:
Copied!Unattended-Upgrade::Allowed-Origins { "${distro_id}:${distro_codename}-security"; }; Unattended-Upgrade::Automatic-Reboot "false";
Apply Pending Update
Copied!# Ubuntu/Debian sudo apt update sudo apt upgrade -y # RHEL/CentOS sudo yum update -y
Schedule via Cron (using Server Explorer’s Cron manager):
- Frequency: Weekly
- Day: Sunday at 3 AM
- Command:
/usr/bin/apt update && /usr/bin/apt upgrade -y
Configure Time Synchronization
Copied!# Ubuntu/Debian (systemd-timesyncd) sudo timedatectl set-ntp true # Check status timedatectl status # RHEL/CentOS (chronyd) sudo systemctl enable chronyd sudo systemctl start chronyd
Harden Filesystem Mounts
Edit /etc/fstab via Server Explorer’s Explorer:
Copied!tmpfs /tmp tmpfs defaults,noexec,nosuid,nodev 0 0 tmpfs /var/tmp tmpfs defaults,noexec,nosuid,nodev 0 0
Apply immediately:
Copied!sudo mount -o remount /tmp sudo mount -o remount /var/tmp
Priority 3: Recommended (Do This Month)
Enable Auditd or Persistent Journald
Option 1: Auditd (more detailed)
Copied!sudo apt install auditd sudo systemctl enable auditd sudo systemctl start auditd
Option 2: Journald persistence
Copied!sudo mkdir -p /var/log/journal sudo systemctl restart systemd-journald
Verify persistence:
Copied!journalctl --verify
Configure Certbot Auto-Renewal
Copied!# Install certbot sudo apt install certbot python3-certbot-nginx # Obtain certificate sudo certbot --nginx -d yourdomain.com # Test renewal sudo certbot renew --dry-run
Verify timer (systemd):
Copied!sudo systemctl status certbot.timer
Or schedule via Cron (using Server Explorer):
Copied!0 0 1 * * certbot renew --quiet && systemctl reload nginx
Enable SELinux/AppArmor
Ubuntu/Debian (AppArmor):
Copied!sudo systemctl enable apparmor sudo systemctl start apparmor # Check status sudo aa-status
RHEL/CentOS (SELinux):
Copied!# Check current mode getenforce # Set to enforcing sudo setenforce 1 # Make permanent sudo vi /etc/selinux/config # Set: SELINUX=enforcing
Warning: Test in permissive mode first to avoid breaking applications.
Disable Unnecessary Services
Check what’s running:
Copied!sudo systemctl list-units --type=service --state=running
Disable common unnecessary services:
Copied!# Network discovery (rarely needed on servers) sudo systemctl disable avahi-daemon sudo systemctl stop avahi-daemon # Printing (why on a server?) sudo systemctl disable cups sudo systemctl stop cups # Bluetooth (VPS doesn't have bluetooth) sudo systemctl disable bluetooth sudo systemctl stop bluetooth
Audit Sudo Users
List users with sudo access:
Copied!sudo grep -Po '^sudo.+:\K.*$' /etc/group
Review sudoers file:
Copied!sudo visudo
Remove unnecessary sudo access:
Copied!sudo deluser username sudo # Ubuntu/Debian sudo gpasswd -d username wheel # RHEL/CentOS
Optimize SSH Settings
Edit /etc/ssh/sshd_config:
Copied!# Reduce auth tries MaxAuthTries 3 # Reduce grace time LoginGraceTime 30 # Disable empty passwords PermitEmptyPasswords no # Disable X11 forwarding if not needed X11Forwarding no # Use strp ciphers only Ciphers chacha20-poly1305@openssh.com,aes256-gcm@openssh.com MACs hmac-sha2-512-etm@openssh.com,hmac-sha2-256-etm@openssh.com
Restart SSH:
Copied!sudo systemctl restart sshd

Try Server Explorer Today
Manage your servers with just a few clicks. Replace complex command-line operations with an intuitive interface, while maintaining the performance and security of traditional SSH access.
Server Explorer Security Features:
✅ 18 automated security checks
✅ Visual security reports with priority levels
✅ Step-by-step fix instructions
✅ One-click access to config files
✅ Integrated terminal for advanced tasks
✅ Regular scan scheduling
✅ Security trend tracking
✅ Compliance-ready audit logs
Conclusion: Security Doesn’t Have to Be Overwhelming
With the right tools and clear guidance, anyone can secure VPS in 2026 without advanced sysadmin skills. Instead of memorizing dozens of commands or reading through scattered documentation, you get:
- Clear visual indicators of your security posture
- Prioritized fixes so you know what matters most
- Automated scanning that catches issues you’d miss manually
- Educational guidance that helps you learn as you secure
The result? Professional-grade security without requiring years of sysadmin experience.
Your applications deserve secure infrastructure. Your users deserve protected data. Your business deserves peace of mind.
Start securing your VPS today with Server Explorer’s automated security scanning.
Remember: Server Explorer’s Security section automates these checks—use commands for verification and learning.