How to Connect to a Linux Server from Windows Without PuTTY
You don’t need PuTTY to connect to a Linux server from Windows anymore.
For years, PuTTY has been the default SSH client on Windows. But today, modern tools make it possible to connect to Linux servers more easily, more visually, and without fighting outdated interfaces or confusing configurations.
In this guide, you’ll learn:
- Why PuTTY is no longer the best option for Windows SSH
- What modern alternatives exist on Windows for connecting to Linux servers
- How to connect to a Linux server using visual SSH clients that save time
- Step-by-step instructions for each method
Whether you’re a developer managing VPS servers, an IT admin connecting to remote systems, or a beginner learning server administration, these PuTTY alternatives for Windows offer better security, functionality, and user experience in 2025.
Why PuTTY Is No Longer the Best Option on Windows
PuTTY is not broken. It is simply outdated for modern server workflows.
For over 25 years, PuTTY has been the go-to tool for Windows users who need to SSH to Linux servers. It’s reliable, lightweight, and gets the job done. But in 2025, its limitations have become increasingly apparent.
Common PuTTY Limitations
1. Old User Interface
- Looks like it’s from Windows 95 (because it is)
- Hasn’t evolved much in 20+ years
- Configuration requires navigating multiple confusing dialogs
- No modern conveniences (tabs, themes, customization)
2. Manual SSH Key Management
- Separate tool required (PuTTYgen) for key generation
- Different key format (.ppk) from standard OpenSSH
- No integration with Windows Credential Manager
- Confusing for beginners
3. No Server Overview
- One window per connection (no tabs)
- Can’t see all your servers at once
- No way to organize or group connections
- Hard to manage multiple servers
4. Terminal Only
- No file management (requires separate WinSCP)
- No visual context of server state
- Can’t see CPU, RAM, disk usage
- Just a terminal window—nothing more
5. No Modern Server Management
- No Docker container management
- No process monitoring (PM2, systemd services)
- No security scanning
- No cron job scheduling
- No integrated log viewer
For Simple Connections, PuTTY Works
PuTTY is perfectly fine if you:
- Connect to servers once a month
- Only need basic terminal access
- Don’t mind the dated interface
- Have no need for file management or monitoring
For Daily Server Management, It’s Frustrating
PuTTY becomes painful when you:
- Manage multiple servers regularly
- Need to edit files frequently (download-edit-upload cycle)
- Want to see server health at a glance
- Switch between many connections daily
- Need integrated file management
- Want modern security features
This is why many Windows users now look for alternatives to connect to Linux servers more efficiently.
For context on modern SSH best practices, SSH Academy provides comprehensive guides.
Modern Ways to Connect to a Linux Server from Windows
In 2025, Windows users have multiple excellent options for connecting to Linux servers without PuTTY:
Option 1: Windows Built-in OpenSSH
What: Native SSH client included in Windows 10/11
Best for: Command-line users, scripting, quick connections
Pros: Pre-installed, standard OpenSSH, no downloads
Cons: Command line only, no GUI, no visual context
Option 2: Visual SSH GUI Clients
What: Modern applications with visual interfaces (Server Explorer, Termius, etc.)
Best for: Daily server management, file editing, monitoring
Pros: Visual file management, server dashboards, modern UI
Cons: Requires installation (though lightweight)
Option 3: Windows Terminal
What: Microsoft’s modern terminal with tabs and customization
Best for: Power users who want better terminal experience
Pros: Tabs, themes, multiple shells, modern interface
Cons: Still command-line based, no file management
Option 4: Windows Subsystem for Linux (WSL)
What: Full Linux environment inside Windows
Best for: Developers who want native Linux tools
Pros: True Linux experience, all Linux commands
Cons: Requires WSL setup, still terminal-based
Let’s explore each method in detail.
Method 1: Windows Built-in OpenSSH
The best-kept secret: Windows 10 and 11 include SSH natively.
Recent versions of Windows include OpenSSH by default. This means you can connect to Linux servers from Windows without installing any additional software—no PuTTY required.
Check If OpenSSH Is Installed
Open Command Prompt or PowerShell and type:
ssh -VExpected output:
OpenSSH_for_Windows_8.6p1, LibreSSL 3.4.3If you see this, SSH is already installed on your Windows system.
Install OpenSSH (If Not Present)
If the command returns an error, install OpenSSH:
Via Windows Settings:
- Open Settings → Apps → Optional Features
- Click Add a feature
- Search for “OpenSSH Client”
- Click Install
- Wait 2-3 minutes
- Restart Command Prompt/PowerShell
Via PowerShell (as Administrator):
Add-WindowsCapability -Online -Name OpenSSH.Client~~~~0.0.1.0Connect to Your Linux Server
Basic SSH connection command:
ssh username@your-server-ipReal example:
ssh deploy@192.168.1.100First-time connection will show security prompt:
The authenticity of host '192.168.1.100' can't be established.
ECDSA key fingerprint is SHA256:abc123...
Are you sure you want to continue connecting (yes/no)?
Type “yes” and press Enter.
Enter your password when prompted:
deploy@192.168.1.100's password: [type your password]Success! You’re now connected to your Linux server from Windows.
Using SSH with Custom Port
If your server uses a non-standard SSH port:
ssh -p 2222 username@server-ipConnecting with SSH Key
If you have an SSH key configured:
ssh -i C:\Users\YourName\.ssh\id_rsa username@server-ipWhat You Can Do with Windows OpenSSH
Execute remote commands:
ssh user@server "uptime"
ssh user@server "df -h"
File transfer with SCP:
scp local-file.txt user@server:/remote/path/
scp user@server:/remote/file.txt C:\local\path\
Port forwarding (tunnel):
ssh -L 8080:localhost:80 user@serverAdvantages of Windows Native SSH
✅ Pre-installed on Windows 10 (1809+) and Windows 11
✅ Standard OpenSSH (same as Linux/Mac—compatible everywhere)
✅ No additional software needed
✅ Works in CMD and PowerShell
✅ Command-line scriptable
✅ Regular security updates from Microsoft
✅ Integrates with Windows features
Limitations of Command-Line SSH
❌ Pure command line – No visual context or GUI
❌ No server overview – Can’t see server status at a glance
❌ No file management – Requires separate tools for SFTP
❌ Single window – No tabs (need multiple windows)
❌ No assistance for beginners – Must know Linux commands
❌ Manual configuration – SSH keys and configs require manual setup
When to Use Windows OpenSSH
Windows OpenSSH is perfect for:
- Quick one-off SSH connections
- Scripting and automation tasks
- Users comfortable with command line
- When you only need terminal access
- Minimal installation requirements
It’s less ideal for:
- Daily server management
- Visual file editing
- Monitoring server resources
- Managing multiple servers
- Beginners learning Linux
Official guide: Microsoft OpenSSH documentation
Method 2: Server Explorer (Visual SSH Client)
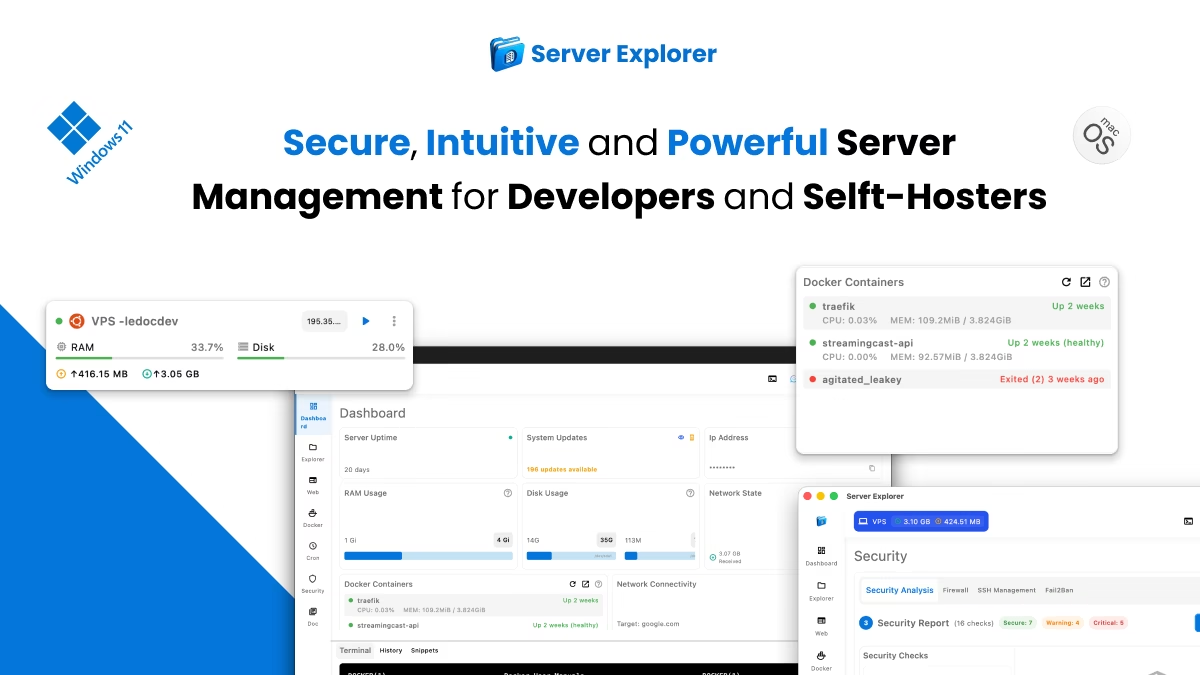
Server Explorer is a modern SSH GUI client for Windows that provides visual server management—not just terminal access.
Unlike PuTTY or command-line SSH, Server Explorer connects to Linux servers and provides a complete visual interface for files, processes, Docker containers, security, and more.
What Server Explorer Provides
A visual interface for SSH server connections:
- File browser (no more download-edit-upload)
- Integrated SSH terminal (when you need it)
- Server dashboard (CPU, RAM, disk at a glance)
- Docker container management
- PM2 process monitoring
- Security scanner
- Cron job scheduler
- Real-time log viewer
No software is installed on your Linux server—everything runs on your Windows PC via secure SSH.
Step-by-Step: Connect to Linux Server with Server Explorer
Step 1: Install Server Explorer on Windows
Download and Install from:
Step 2: Add Your Linux Server
Click “Add Server” button
Enter server details:
Server Name: Production Server (or any memorable name)
Host: 192.168.1.100 (your server IP or hostname)
Port: 22 (default SSH port, or custom if changed)
Username: deploy (your SSH username)
Password Or SSH Key : *************
All settings are stored securely on your Windows machine—never on a server.
Step 3: Connect
Click “Connect” → Establishes SSH connection
You now have:
- ✅ Live SSH terminal (integrated)
- ✅ Visual file browser (edit files in-place)
- ✅ Server dashboard (CPU, RAM, disk graphs)
- ✅ Access to Docker, PM2, logs, security tools
- ✅ Clear server context (always know what’s happening)
This removes friction without hiding SSH itself.
What You Can Do with Server Explorer
File Management:
- Browse files like Windows Explorer
- Edit configuration files with syntax highlighting
- Upload/download with drag-and-drop
- Set permissions visually (no chmod memorization)
- Search entire filesystem
Server Monitoring:
- Real-time CPU/RAM/disk usage
- Process list with resource consumption
- Network activity monitoring
- Historical graphs and trends
Docker Management:
- View all containers and their status
- Start/stop/restart containers
- Live log streaming
- Container filesystem browser
- Manage images, volumes, networks
Security:
- Automated security scan (18 checks)
- SSH hardening recommendations
- Firewall status
- Open port analysis
- Pending security updates
Process Management (PM2):
- Node.js application monitoring
- Restart services with one click
- Live application logs
- CPU/memory per process
Cron Jobs:
- Visual cron scheduler
- No cron syntax needed
- See all scheduled tasks
Terminal Access:
- Full SSH terminal when needed
- Multiple terminal tabs
- Command history
- Integrated with file browser (copy paths)
Advantages Over PuTTY and Command-Line SSH
✅ Visual file management – Edit files directly, no download/upload
✅ Server overview – See health at a glance
✅ Modern UI – Intuitive, not overwhelming
✅ Integrated tools – Docker, PM2, security, cron in one app
✅ Easier SSH key management – Built-in key generation
✅ Multi-server – Switch between servers quickly
✅ Beginner-friendly – Visual context helps learning
✅ Time-saving – Common tasks are point-and-click
When to Use Server Explorer
Server Explorer is ideal if you:
- Manage Linux VPS servers from Windows regularly
- Want visual file management (not just terminal)
- Need to monitor server health
- Work with Docker containers or Node.js (PM2)
- Prefer modern GUI over pure command line
- Want all server tools in one place
Related guides:
- How to Manage a VPS Without Command Line (internal link)
- Managing Docker Containers Without Command Line (internal link)
- Server Explorer vs Terminal SSH: Which One Should You Use? (internal link)
Method 3: Windows Terminal
Windows Terminal is Microsoft’s modern terminal application with tabs, themes, and better SSH experience than Command Prompt.
If you prefer command-line SSH but want a modern interface, Windows Terminal transforms the SSH experience on Windows.
What Is Windows Terminal?
Windows Terminal is a free, modern terminal emulator from Microsoft that supports:
- Multiple tabs (CMD, PowerShell, WSL, SSH in one window)
- Split panes (multiple terminals side-by-side)
- GPU-accelerated rendering (smooth scrolling, emoji support)
- Customizable themes and colors
- Unicode and emoji support
- Configurable keybindings
- Multiple shell profiles
It makes command-line SSH much more pleasant on Windows.
Install Windows Terminal
Method 1: Microsoft Store (Easiest)
- Open Microsoft Store
- Search “Windows Terminal”
- Click Install (free)
- Launch from Start Menu
Method 2: winget (Command Line)
winget install Microsoft.WindowsTerminalConnect to Linux Server via Windows Terminal
Open Windows Terminal and type:
ssh username@server-ipWindows Terminal advantages over regular Command Prompt:
- Tabs for multiple SSH connections
- Better copy/paste (Ctrl+Shift+C/V)
- Customizable themes
- Split panes (multiple servers visible)
- Modern font rendering
Create SSH Connection Profiles
Save SSH connections as Windows Terminal profiles for one-click access.
Edit settings:
- Open Windows Terminal
- Press Ctrl + , (opens settings)
- Click “Open JSON file” in bottom-left
- Add SSH profiles to
profiles.list:
{
    "guid": "{unique-guid-here}",
    "name": "Production Server",
    "commandline": "ssh deploy@prod.example.com",
    "icon": "🖥️"
},
{
    "guid": "{another-unique-guid}",
    "name": "Staging Server",
    "commandline": "ssh deploy@staging.example.com",
    "icon": "🔧"
}
Generate unique GUIDs at: guidgenerator.com
Now you can:
- Click ▼ next to new tab button
- Select “Production Server” or “Staging Server”
- Instant SSH connection
Customize Windows Terminal for SSH
Change theme: Settings → Appearance → Theme (Light, Dark, or custom)
Change font: Settings → Profiles → Defaults → Appearance → Font face
Popular SSH fonts:
- Cascadia Code (default, excellent)
- Fira Code (programming ligatures)
- JetBrains Mono (clean, readable)
Enable transparency: Settings → Profiles → Defaults → Appearance → Transparency
Advantages of Windows Terminal for SSH
✅ Modern interface (tabs, themes, customization)
✅ Multiple connections in one window
✅ Split panes (see multiple servers)
✅ Saved profiles (one-click connections)
✅ Better rendering (GPU-accelerated)
✅ Free from Microsoft
Limitations
❌ Still command-line – No visual file management
❌ No server monitoring – Terminal only
❌ No Docker/PM2 integration
❌ Requires command knowledge
Best for: Users comfortable with command line who want modern terminal experience.
Official guide: Windows Terminal documentation
Method 4: Other SSH GUI Tools for Windows
Beyond Server Explorer, several other visual SSH clients exist for Windows:
Termius (Cross-Platform)
Platform: Windows, macOS, Linux, iOS, Android
Price: Free (basic) / $10/month (Pro)
Best for: Mobile SSH access
Features:
- Cloud sync across devices
- SFTP client built-in
- Port forwarding GUI
- Modern interface
Pros: Mobile apps, cross-platform
Cons: Limited server management, subscription pricing
Website: termius.com
MobaXterm (Windows Power Tool)
Platform: Windows only
Price: Free (Home)
Best for: Power users, X11 forwarding
Features:
- Tabbed interface
- X11 server built-in
- SFTP sidebar
- Network tools included
- Session recording
Pros: Feature-packed, free version available
Cons: Overwhelming for beginners, dated UI
Website: mobaxterm.mobatek.net
Bitvise SSH Client (Windows SFTP Focus)
Platform: Windows only
Price: Free (personal use)
Best for: SFTP + terminal combo
Features:
- Terminal + SFTP in one app
- Port forwarding GUI
- SSH key management
- Stable and professional
Pros: Free, reliable, SFTP integrated
Cons: UI dated, limited to file transfer + terminal
Website: bitvise.com
Related: Best SSH GUI Tools for MacOS and Windows (2026 Edition) (internal link)
PuTTY vs Modern Alternatives: Quick Comparison
| Feature | PuTTY | Windows OpenSSH | Windows Terminal | Server Explorer |
|---|---|---|---|---|
| Visual file management | ❌ | ❌ | ❌ | ✅ Advanced |
| File editing | ❌ | ❌ | ❌ | ✅ Syntax highlighting |
| Modern UI | ❌ 1990s | ❌ CLI | ✅ Modern CLI | ✅ Modern GUI |
| Tabbed connections | ❌ | ❌ | ✅ | ✅ |
| Server dashboard | ❌ | ❌ | ❌ | ✅ CPU/RAM/Disk |
| Docker management | ❌ | ❌ | ❌ | ✅ |
| Security scanning | ❌ | ❌ | ❌ | ✅ 18 checks |
| SSH key management | Manual (PuTTYgen) | Manual | Manual | ✅ Built-in |
| Beginner-friendly | ❌ | ❌ | ⚠️ CLI | ✅ |
| Installation | Download | Pre-installed | Microsoft Store | Download/Store |
| Price | Free | Free | Free | Paid |
| Best for | Legacy systems | Quick CLI SSH | Modern CLI users | Visual management |
This is not about replacing SSH. It’s about using SSH more efficiently.
SSH Key Setup on Windows
SSH keys are more secure than passwords and work with all SSH methods.
Why Use SSH Keys?
✅ More secure – Can’t be brute-forced
✅ No password typing – Automatic authentication
✅ Revocable – Disable without changing passwords
✅ Required for many production servers
Generate SSH Key on Windows
Using Windows OpenSSH (Recommended):
ssh-keygen -t ed25519 -C "your-email@example.com"Follow prompts:
Enter file in which to save the key: [Press Enter for default]
Enter passphrase: [Optional but recommended]
Enter same passphrase again: [Confirm]
Keys are saved to:
- Private key:
C:\Users\YourName\.ssh\id_ed25519 - Public key:
C:\Users\YourName\.ssh\id_ed25519.pub
Copy Public Key to Linux Server
Method 1: Manual Copy
Display your public key:
type C:\Users\YourName\.ssh\id_ed25519.pubSSH to your server (with password) and run:
mkdir -p ~/.ssh
echo "paste-your-public-key-here" >> ~/.ssh/authorized_keys
chmod 700 ~/.ssh
chmod 600 ~/.ssh/authorized_keys
Method 2: Using ssh-copy-id (if available in Windows):
ssh-copy-id username@server-ipTest SSH Key Connection
ssh -i C:\Users\YourName\.ssh\id_ed25519 username@server-ipIf successful, you connect without password.
Use SSH Key with Server Explorer
- Add server in Server Explorer
- Choose “SSH Key” authentication
- Browse to
C:\Users\YourName\.ssh\id_ed25519 - Enter key passphrase (if set)
- Connect
Server Explorer remembers the key—no need to specify it again.
Comprehensive guide: DigitalOcean SSH Key Setup
Which Method Should You Choose?
Choose based on your needs and comfort level:
Choose Windows OpenSSH (Built-in CLI) If:
✅ You only need terminal access
✅ You’re comfortable with command line
✅ You want zero additional software
✅ You need scripting capabilities
✅ Quick one-off connections are your main use
Choose Windows Terminal If:
✅ You want modern CLI with tabs
✅ You manage multiple servers
✅ You like command line but want better UX
✅ You want customization (themes, fonts)
✅ You’re a PowerShell or WSL user
Choose Server Explorer (Visual GUI) If:
✅ You manage servers daily
✅ You want visual file management
✅ You need Docker or PM2 monitoring
✅ You prefer GUI over pure CLI
✅ You want server health dashboards
✅ You’re learning Linux administration
✅ You want security scanning
Choose PuTTY If:
✅ You’re on a very old Windows version
✅ You need absolute minimum installation
✅ You’re already familiar with it
✅ You don’t mind the dated interface
For most Windows users managing Linux servers in 2025, Server Explorer or Windows Terminal are the best options.
Do You Still Need PuTTY?
In some cases, PuTTY is fine:
✅ Very old Windows environments (pre-Windows 10 1809)
✅ One-off connections on locked-down machines
✅ You’re already comfortable with it and don’t manage servers often
✅ Absolute minimum software footprint required
But for modern Windows setups managing Linux servers regularly, there’s no strong reason to stay with PuTTY as your main tool.
Modern alternatives offer:
- Better security (proper credential storage)
- Visual context (see what you’re doing)
- File management (no separate tools)
- Server monitoring (CPU, RAM, disk)
- Modern UI (easier to use)
- Time savings (visual workflows)
PuTTY served Windows users well for 25 years. It’s time to move forward.
Conclusion
Connecting to a Linux server from Windows without PuTTY is not only possible—it’s often better.
Modern SSH tools for Windows provide:
✅ Cleaner workflow – Visual file management, integrated tools
✅ Better visibility – Server dashboards, resource monitoring
✅ Fewer mistakes – Visual confirmation, guided workflows
✅ Faster daily operations – Point-and-click for common tasks
✅ Modern experience – Tabs, themes, intuitive interfaces
You still use SSH. You just stop fighting outdated tools.
Quick Recommendations
For beginners: Start with Server Explorer (visual guidance)
For CLI users: Use Windows Terminal (modern terminal experience)
For quick connections: Use Windows OpenSSH (pre-installed)
For mobile access: Use Termius (cross-platform sync)
If you manage Linux servers from Windows regularly, it’s time to move beyond PuTTY.
Get Started with Modern SSH on Windows
Ready to connect to Linux servers the modern way?

Try Server Explorer Today
Manage your servers with just a few clicks. Replace complex command-line operations with an intuitive interface, while maintaining the performance and security of traditional SSH access.
What you get:
✅ Visual file browser with syntax highlighting
✅ Integrated SSH terminal
✅ Server dashboard (CPU/RAM/disk)
✅ Docker container management
✅ PM2 process monitoring
✅ Security scanner (18 automated checks)
✅ Cron job scheduler
✅ Multi-server management
Available for Windows and macOS.